Sunday, August 28, 2016

No-mato Hawaiian Barbecue Chicken

Your new BBQ is here.

This recipe was inspired by a Hawaiian barbecue dish I was told about. It sounded delicious, so I looked into how it was made. Sadly, half of the ingredients were things I couldn't eat. Sound familiar? Tomatoes, garlic, onion, soy sauce, the list goes on. So, while I couldn't make an exact flavor replica, this sauce is still pretty darn good and I love the unexpected pineapple hints.

Whenever I make a tomato-free recipe, pureed pumpkin is my go-to replacement. Just add some vinegar to give it the same bite as tomato. Maple syrup didn't seem like enough to create that recognizable barbecue sweetness, so I tossed in some coconut sugar. It was the perfect addition because coconut sugar tends to have a brown sugar flavor. Somehow, the use of these ingredients created the perfect barbecue base.

While the sweetness was there, the smokey flavor was missing. Throwing in bacon grease fixed that little problem. If you'd like an even smokier flavor, adding smoked paprika, if you tolerate it, really spices things up. I imagine chipotle pepper would pair well too. 

I couldn't have been happier with the result of this barbecue sauce. Sweet, slightly fruity, and just enough smokiness. This recipe will liven any dinner while keeping your stomach happy. Read below for the recipe.


Serves: 4-5
Prep Time: 1 hour
Cook Time: 1 hour
Total Time: 2 hours

Ingredients
  • 10 chicken legs
  • 1 cup pureed pumpkin
  • 1 cups broth
  • 1/2 cup green onion chopped (green part only)
  • 4 cloves of garlic, crushed
  • 1 cup pineapple chunks
  • 1/4 cup maple syrup or honey
  • 2 Tbs. red wine vinegar
  • 2 Tbs. bacon grease
  • 1/4 cup coconut sugar
  • 1 tsp. ground ginger
  • 1/2 tsp. sea salt
  • 1/4 tsp. smoked paprika (omit for AIP )
Instructions:
  1. Preheat oven to 400 F and take out a glass baking dish.
  2. Combine all ingredients in a pot and let simmer for 20 minutes.
  3. Remove the crushed garlic cloves.
  4. Allow the mixture to slightly cool before pouring into a blender or food processor.
  5. Blend until a sauce consistency is reached.
  6. Place the chicken legs into the baking dish and spoon the sauce over them evenly.
  7. Pour the broth over the chicken and place into the oven to bake for 1 hour, turning and basting the chicken every 15 minutes.

I hope you enjoy this chicken as much as we did! 
***
A Spunky Inquiry:
What's your favorite BBQ flavor?

Thursday, August 25, 2016

Banana Bread Cookies { egg, nut, dairy, and grain free }

* FTC Disclosure: This post contains affiliate links. If you decide to make a purchase, I will receive compensation at no additional cost to you. Thank you!

I love a good, warm slice of banana bread.

But sometimes you don't feel like making an entire loaf. That's where these cookies come in. They take little effort to make and little time to bake; a great way to get your banana bread fix in a jiffy!

The night I came up with these cookies, I was desperate for a sweet treat. The only problem was that I didn't have enough almond butter to make Paleo Maple Almond Butter Cookies, no lemon for Paleo Lemon Cookies, and I didn't have any chocolate chips to go the chocolate chip cookie route. However, I did have multiple ripe bananas. 

I was forced to create little disks of banana bread heaven. So I got to work mashing some banana, adding a little of this and a little of that until I felt like the mixture had reached cookie dough consistency. After some coconut flour, flax seed meal, and various other flavor makers, a solid dough was formed.

Banana Bread Cookies really do taste just like a bite of banana bread! Warm and bread like in texture, these cookies will be the perfect sweet tooth satisfier. I love making them in a pinch and they really hit the spot. To get started making these, read below!


Yield: 8 cookies
Prep Time: 10 minutes
Cook Time: 15 minutes
Total Time: 25 minutes

Ingredients
Instructions:
  1. Preheat the oven to 350 F and line a baking sheet with parchment paper.
  2. In a bowl mash the bananas very well until smooth then add the maple syrup.
  3. In a separate bowl combine remaining ingredients.
  4. Add the banana mixture to the dry ingredients and mix until smooth.
  5. Roll the dough into 8 dough balls.
  6. Place on the baking sheet and flatten slightly with the palm of your hand. 
  7. Place in the oven and bake for 15 minutes.
  8. Remove from oven and allow to cool.
Enjoy the yummy bites of banana bread! Warm, cinnamon goodness awaits.
***
A Spunky Inquiry:
What quick treat do you use to satisfy your sweet tooth?


Wednesday, August 24, 2016

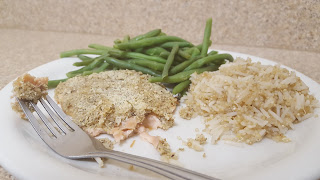
Rosemary Almond Crusted Salmon

* FTC Disclosure: This post contains affiliate links. If you decide to make a purchase, I will receive compensation at no additional cost to you. Thank you!

Crunchy salmon is my new obsession.

At first the idea of adding a crust to my salmon didn't appeal to me. It reminded me too much of fish sticks, which I was never a fan of. But, after some recipe research, I was willing to give it a try. I'm so glad I did because it is delicious and nutritious! I'm so excited to share our version of almond crusted salmon with you.

I really do love to eat salmon. It leaves me feeling good and I know it's good for me. But it always seems like there are only so many ways you can doctor it up. Yup, we get stuck in the trusty recipe rut. So, it was time to use some good ole ingenuity and come up with something new!

The basis of this salmon recipe came from the fusion of a few different flavor combinations. There was rosemary fish, mustard maple glazed fish, and a simple almond crusted fish. I had a feeling that all of these flavors would go together beautifully. And to my surprise, they did!

A delicious crunch, an herbal kick, and a smooth sauce underneath. You have to try this for yourself, it defeats the oh-so-common dinner time monotony. We served ours with a side of vegetables and quinoa to make a wonderfully round meal. Read below to discover how to make this yummy salmon.


Serves: 4
Prep Time: 10 minutes
Cook Time: 20 minutes
Total Time: 30 minutes

Ingredients
  • 4 salmon fillets
  • 1 Tbs. olive oil
  • 1 Tbs. freshly squeezed lemon juice
  • 1 Tbs. brown mustard
  • 1 Tbs. maple syrup
  • 1/2 cup almond flour/meal
  • 1 Tbs. rosemary
  • 1/2 tsp. sea salt and pepper
Instructions:
  1. Preheat oven to 400 F and place parchment paper and a cookie sheet.
  2. Mix olive oil, mustard, and maple syrup then spread mixture on the tops of your salmon fillets.
  3. Combine remaining ingredients and crumble your mixture on the tops of the fillets, making sure it sticks well to the oil mixture.
  4. Place fillets on the cookie sheet and into the oven to bake for 20 minutes or until the tops are slightly browned and the fish is done to your liking.
I can't wait for you to try this recipe! It's so good for you and yet it has the taste of comfort food. Enjoy!
***
A Spunky Inquiry:
Which salmon recipe do you make over and over again?

Tuesday, August 23, 2016

Spicy Citrus Saffron Chicken

This chicken is the flavor of cultural fusion at its best.

Fragrant saffron takes you straight to Spain while the spicy, warming ginger draws you back to a taste of Asian cuisine. Citrus notes from the orange can allude to the food of various cultures across the globe. In short, this recipe is a world tour in your mouth.

Chicken is such a versatile meat to use, and I love experimenting with exotic flavors. Saffron is especially one of my favorites. It is so unique in flavor and a little goes a long way. I love the color and aroma it adds to a dish. Such a wonderful little spice deserves a partner in crime, ginger!

Ginger brightens up any dish and I felt it would be the perfect buddy for the saffron. I had heard of orange ginger chicken and also orange saffron chicken, so I thought, why not combine the two? The results were heavenly.

Spicy and savory all in one, this is the ultimate 'winner winner chicken dinner'. Not only is it delicious, but easy to prepare as well. Toss all of the ingredients into a container and let marinade for at least two hours or overnight. When you're ready to prepare it, bake it in the oven and baste every 15 minutes. It's that simple! Get started on your flavor world tour by reading the recipe below!


Serves: 4
Prep Time:
Cook Time:
Total Time:

Ingredients
  • 10 chicken legs
  • 1/4 cup of olive oil
  • juice and zest of two large oranges
  • 1 crushed garlic clove
  • 1 Tbs. freshly grated ginger
  • 1 tsp. dried thyme
  • 2 generous pinches of saffron strands
  • 1 tsp. pepper (omit for AIP)
  • 1/2 tsp. sea salt
  • optional: 1 lb. baby carrots
Instructions:
  1. Combine all ingredients in a large container and let marinade for at least 2 hours or overnight.
  2. When ready to bake, preheat oven to 400 F and take out a 9 by 13 inch glass baking pan.
  3. Pour all ingredients into the pan and place in oven for 1 hour, basting the chicken with its marinade every 15 minutes. Remove garlic clove before serving.
That's all there is to it! Enjoy this exquisite dish, I know I can't wait to make it again.
***
A Spunky Inquiry:
What's your favorite cultural dish?

Monday, August 22, 2016

Low FODMAP Marinated Chicken

Who doesn't love a good marinated chicken?

I know I do, it reminds me of good memories and summer cookouts. This chicken is juicy and packed with that tangy flavor that leaves everyone asking for seconds. If you have a grill, now would be a good time to use it! If you don't, it can be made just as easily in a cast iron skillet, which is what we used this time around.

The great thing about this marinated chicken is that it contains no nightshades, no FODMAPs, and no sugar. This is a true-blue good for your tummy recipe! Also, if you don't have the time to marinade the chicken, the cast iron skillet method is the best way to go. When using the skillet, pour all of your marinade in with the chicken, allowing the sauce to quickly flavor the chicken.

We've had to use this 'emergency' method for a quick dinner and, quite to our surprise, it worked! The chicken was still so flavorful. So, this means there are three ways to cook this chicken: on the grill after marinating, in a skillet after marinating, and in the skillet with no wait time! This way, you can enjoy this recipe by preparing it the day before or throwing it together in a pinch. Now, we can all have a taste of summer whenever we want.

We enjoyed our chicken with green beans and a roasted mixture of turnip and Japanese sweet potato.
Serves: 4-6
Prep Time: 10 minutes
Cook Time: 30 minutes
Total Time: 40 minutes

Ingredients:
  • 4-6 chicken breasts
  • juice of half a lemon
  • juice of 1 lime
  • 1/4 cup maple syrup
  • 1/4 cup red wine vinegar
  • 1/4 cup olive oil
  • 3 Tbs. brown mustard
  • 3 crushed garlic cloves
  • 1 tsp. black pepper
  • 1 1/2 tsp. sea salt
Instructions:
  1. Mix all of the ingredients together, making sure to pierce the chicken, and store in the refrigerator over night. Alternatively, this can also be made immediately, however marinating gives more flavor.
  2. Heat a cast iron skillet on medium high and place the chicken on the bottom, then pour the marinade sauce over the chicken. If grilling, baste the chicken with the marinade every 10 minutes.
  3. Cover the skillet with a lid and cook for 30 minutes, flipping the chicken after the first 15 minutes.
  4. After cooking, remove the garlic cloves and serve.
I love this recipe and I hope you do as well. Enjoy!
***
A Spunky Inquiry:
What are some of your summer cookout foods?


Low FODMAP Skillet Bacon Green Beans

Your green bean just got a whole lot tastier.

One of the easiest low FODMAP side dishes to make is green beans. Broccoli used to be my family's go-to, but it contains FODMAPs and is off the list for now. As with any frequently used side dish, you sometimes get bored with the repetitive flavor. Worry no longer my friend, there is a delicious solution!

By adding bacon and green onion to the dish, and cooking the green beans in the bacon grease, the yum factor goes through the roof. Ah bacon, it always saves the day. It makes all of your problems disappear. Can I get an amen? Amen!

This recipe couldn't be more simple. Take out your trusty skillet and cook some bacon. Then, steam your green beans. After they're done steaming, toss them in the leftover bacon grease in the skillet. Finally, add in your chopped bacon and green onion. Voila! You now have some wonderfully flavorful green beans.

Skillet green beans go well with just about any main course. Eat some with a good burger. Serve them alongside salmon. This is a side dish perfect for any of your chicken recipes. Get started cooking below!


Serves: 4
Prep Time: 5 minutes
Cook Time: 25 minutes
Total Time: 30 minutes

Ingredients
  • 1 bag of frozen green beans
  • 4 slices of bacon
  • 1/4 cup chopped green onion
  • salt and pepper to taste
Instructions:
  1. In a skillet, cook bacon slices until crispy.
  2. Remove cooked bacon and save the bacon grease.
  3. Steam the green beans until tender.
  4. Toss the green beans in the skillet with the bacon grease while it is still warm and add the green onion and chopped bacon. Salt and pepper to your liking.
I love using this recipe for a side dish, it's just so good. I hope you enjoy it!
***
A Spunky Inquiry:
What's your go-to side dish?

Sunday, August 21, 2016

Paleo Lemon Cookies ( With Lot's of Flavor Variations! )

* FTC Disclosure: This post contains affiliate links. If you decide to make a purchase, I will receive compensation at no additional cost to you. Thank you! 

Need a little zest in your life?

These cookies are the perfect solution. Any lemon dessert is automatically my favorite. It must be the interestingly delicious combination of sweet and sour. Mix that with a warm cookie and you've got a winner!

Packed with lemon zest, our lemon cookies are a wonderfully refreshing treat. They have that sort of melt-in-your-mouth, chewy texture, which I really love, don't you? I mean, a cookie isn't a cookie if it's not chewy. What's with cookies that have a cake-like texture? Shouldn't those just be called 'cakies'? Long live the chewy cookie *end
rant. Ahem, anyway, let's continue.

And if these cookies aren't already good enough, there are ways you could add a little more flavor dazzle.

 For example, you could toss in some blueberries or add white chocolate chips, if that's your style. You could even use raspberries or replace some of the lemon juice and zest with lime. OR, you could add shredded coconut and coconut chips! The options are endless. I don't know about you, but my mouth is watering Leave a comment below and share if you've tried one of these variations (or one of your own) and tell us how it turned out!

Read below to get started baking these little delights.


Yield: 8 cookies
Prep Time: 15 minutes
Cook Time: 15 Minutes
Total Time: 30 minutes

Ingredients

  • 1 1/3 cups almond flour
  • 2 Tbs. coconut flour 
  • 1/2 Tbs. grass-fed gelatin
  • 1/2 tsp. baking soda
  • pinch of sea salt
  • zest of 2 lemons
  • juice of half a lemon
  • 1/4 cup coconut oil
  • 1/3 cup maple syrup
  • 1/4 tsp. vanilla extract
  • Optional Add-Ins: blueberries, raspberries, lime, coconut, white chocolate chips, etc.
Instructions:
  1. Preheat oven to 350 F and line a baking sheet with parchment paper.
  2. In a bowl, combine all ingredients and mix well until a dough forms.
  3. Roll the dough into 8 balls, place them on the baking sheet, and slightly flatten each with the palm of your hand.
  4. Place into oven and bake for 15 minutes.
  5. Remove from oven and allow to cool.
Enjoy these zesty treats and don't forget to comment if you try one of the variations or invent your own!
***
A Spunky Inquiry:
Do you prefer cookies or 'cakies'?

Saturday, August 20, 2016

Low FODMAP Egg Muffins

Weekend Brunch is calling.

And these egg muffins are answering. The flavors are reminiscent of a frittata, or an omelet. It's the kind of food you'd want to eat on a rainy Saturday morning. Although my family ate it for dinner along with our Paleo Orange Zucchini Bread Crumble. We have the strange habit of eating breakfast foods for dinner.

These egg muffins are packed with protein. Cheese, bacon, and eggs (of course) make this recipe nutrient dense. And, we added shredded zucchini to up the nutrition that much more. I don't know about you, but when my blood sugar starts
dropping, eating a boiled egg evens it out very quickly. Yet I feel worse and worse while I wait for the egg to boil. These muffins can be stored in the refrigerator for a quick fix in a sticky situation!

Not only are the egg muffins delicious, but they're also fairly simple to make. Place the shredded zucchini and green onion in the bottoms of the muffin tin and then pour your egg mixture over the top, garnishing with bacon. That's all! You could make your egg muffins any size. We used a muffin tin with six large slots, but you could use any size muffin tin that you would like.

Finally, an egg muffin without FODMAPs that I can eat! Get out that lonely zucchini in your fridge that you've been meaning to use and get cooking. And even better, get eating


Serves: 4-6
Prep Time: 25
Cook Time: 25
Total Time: 50 minutes

Ingredients
  • 6 eggs
  • 1/4 cup lactose free cream or coconut cream
  • 2 oz. feta cheese
  • 3 Tbs. grated Parmesan
  • 1/2 tsp. black pepper
  • 1 medium zucchini, grated
  • 1/4 cup green onion chopped (green part only)
  • 3 slices of bacon
Instructions:
  1. Preheat oven to 350 F and grease a muffin tin or line with cupcake liners.
  2. Begin cooking the bacon while prepping the remaining ingredients.
  3. Combine the grated zucchini and chopped green onion in a bowl, then place equal amounts of the mixture in the bottom of each muffin cup.
  4. In another bowl, whisk eggs then add the remaining ingredients, except for the bacon.
  5. Pour the egg mixture into each muffin cup.
  6. Slice the cooked bacon into bits then garnish the tops of the muffins.
  7. Place the muffin tin into the oven and bake for 25 minutes.
Whether you're eating these for breakfast, lunch, dinner, or a midnight snack, the egg muffins will satisfy your belly and your mouth. Enjoy!
***
A Spunky Inquiry:
Do you ever eat breakfast for lunch?

Friday, August 19, 2016

Paleo Orange Zucchini Bread Crumble

* FTC Disclosure: This post contains affiliate links. If you decide to make a purchase, I will receive compensation at no additional cost to you. Thank you! 

Even paleo has its guilty pleasures.

This dessert is definitely one of them. The bread crumble is amazingly moist. Let's not forget the orange glaze for the top; it's addictive. I was honestly eating it by the spoonful.

If you like zucchini bread you will really appreciate this recipe. If you like oranges you will love this recipe. You may end up eating more than you should, just a warning.

Technically, if you'd like, you can leave the bread as is and pour the glaze over the top. However, with this dessert, I wanted to do something a little more fun. By making the bread into a crumble, it gives the impression of a bread pudding, trifle, and streusel all in one while still maintaining its own uniqueness. And it's so fun to create!

 In order to make the bread into a crumble, you get to allow yourself to revert back to your childhood for a moment. Let out your inner kid. Take your hands and just dig into that bread loaf and get all up in there like a toddler that got into finger paint. Use this moment to relieve some stress or to simply have a heyday. Alternatively, you could enlist the help of the nearest child. Either way, get that bread nice and crumbly!

Don't forget to douse the crumbles in the absolutely addictive glaze when you serve it. I will say once more, it is delicious. And remember, there's zucchini in here, so maybe it's not even a dessert. Maybe it's actually a salad *wink*. Dig right in and have fun with this palate pleaser. It does not disappoint.


Serves: 6 to 8
Prep Time: 45 minutes
Cook time: 1 hour minutes
Total Time: 1 hour + 45 minutes

Ingredients

Bread
  • 2 1/4 cups almond flour
  • 1/2 cup coconut flour
  • 1/2 cup coconut sugar
  • 2/3 tsp. cream of tartar
  • 1/3 tsp. baking soda
  • 1/2 tsp. sea salt
  • 1/2 tsp. cinnamon
  • 1/2 tsp. ground ginger
  • 1 grated zucchini
  • half of a peeled orange
  • 1/3 cup freshly squeezed orange juice
  • 4 eggs
  • 1/2 cup almond or coconut milk
  • 1 tsp. vanilla
  • 3 Tbs. coconut oil
  • zest of 1 orange
Glaze
  • 3/4 cup coconut sugar
  • 1/2 Tbs. + 1 tsp. arrowroot flour
  • Juice of 1 freshly squeezed orange juice
  • 2 Tbs. coconut oil
  • 1/4 tsp. ground ginger
  • zest of 1 orange
Instructions:
  1. Preheat oven to 350 F and line a bread pan with parchment paper.
  2. Combine all dry ingredients in a medium sized bowl.
  3. In a blender combine the peeled orange half, the orange zest, and all wet ingredients. Blend well.
  4. Combine the wet and dry ingredients.
  5. Stir in zucchini, making sure to have squeezed out as much moisture as possible first.
  6. Pour the batter into the bread pan and place in the oven. While the bread is baking, prepare the glaze.
  7. Combine the coconut sugar and arrowroot flour in a coffee grinder or high speed blender and blend until a fine powder texture is achieved.
  8. Transfer to a bowl, add remaining glaze ingredients, and set aside.
  9. Once bread is baked remove from oven and allow to slightly cool.
  10. Once cool, remove bread from the pan and crumble the loaf by hand.
  11. Place a serving on a plate or in a bowl and generously drizzle with glaze. If you're not serving immediately, keep the crumble and glaze separate until ready to serve.
Welcome to your next new flavor obsession. Orange and zucchini bread just go so well together. I imagine you could also convert this into a lemon recipe (yum). Get ready for some ooey-gooey goodness. Enjoy!
***
A Spunky Inquiry:
Did you or someone you know every get their hands into something they shouldn't have as a kid?

Thursday, August 18, 2016

Paleo Maple Almond Butter Cookies

* FTC Disclosure: This post contains affiliate links. If you decide to make a purchase, I will receive compensation at no additional cost to you. Thank you! 

These cookies only have 5 ingredients!

So simple to make and yet so satisfying. They can be whipped up and in your mouth in just 15 minutes! Prepare to be amazed.

Does anyone remember those maple nut candies that you could find at just about any grocery store? That is exactly what these scrumptious cookies taste like, but they're a healthy version!

These really should be called 'I have basically no ingredients but I still want a delicious dessert' cookies. Seriously though, you probably already have these ingredients on hand. All it takes is almond flour, almond butter, maple syrup, vanilla, and salt. That's it! And you don't even have to feel guilty about what you're putting in your body (you and I both know we've been there done that, probably too many times).

Making these cookies is as simple as it can get. Throw all of the ingredients in a bowl, mix, bake, serve. How easy is that? I'll tell you how easy, ridiculously easy. The next time you're craving a sweet treat, these cookies will be calling your name.

Couldn't wait to finish taking pictures before taking a bite!

Yield: 8 cookies
Prep Time: 5 minutes
Cook Time: 10 minutes
Total Time: 15 minutes

Ingredients

Instructions:

  1. Preheat oven to 375 F and line a baking sheet with parchment paper.
  2. In a bowl combine all ingredients and mix until dough has formed.
  3. Separate dough into 8 pieces and roll in the palms of your hands to form a ball (*Optional: roll each dough ball in coconut sugar and coat well).
  4. Arrange dough on the baking sheet and slightly flatten, either with the palm of your hand or by making the traditional 'X' shape on the tops using a fork.
  5. Place in the oven and bake for 10 minutes.
  6. Remove from oven and allow to cool (or eat them before they're totally cool; it's okay, I won't judge).
I usually can't resist a freshly baked cookie and eat it while it's still hot, but they do slightly crumble if not allowed to cool first. Enjoy!
***
A Spunky Inquiry:
Do you wait for your cookies to cool before chowing down or can you (like me) not resist yourself?


Low FODMAP Moroccan Chicken

Sometimes your taste buds just need a party...

And these flavors do not disappoint. The taste is somewhere between a gourmet meal from a foreign restaurant and Thanksgiving dinner. It has all the makings of a fancy comfort food! 

As I ate this meal I could taste the individual ingredients. Ginger, saffron, and orange each fought for the flavor spotlight. The result? A spicy sweet punch in your mouth that leaves you wanting more. And let me tell you, the smell of this fragrant chicken will fill your home and make everyone salivate.

I grew up with only white potatoes being used in roast type recipes, but my body doesn't tolerate them anymore. The rutabaga and sweet potato worked so well in this meal that I didn't miss white potatoes one bit.

 That's an accomplishment, because I loved potatoes. Using alternative root vegetables has added some much needed heartiness to my food. They taste wonderful, melding especially well with the poignant flavors. 

This chicken has to be one of my favorite chicken recipes of all time. It's just the sort of thing that makes you feel good each time you eat it. Most Moroccan chicken dishes have large amounts of garlic and onion in them, which makes them off-limits to those avoiding FODMAPs. Thankfully, this version is still bursting with flavor! Some garlic infused olive oil and green onion tops do just the trick. Get started with the recipe below!


Serves: 8-12
Prep Time: 40 minutes
Cook Time: 1 hour
Total Time: 1 hour + 40 minutes

Ingredients

  • 12 boneless skinless chicken thighs
  • 2 cups chopped carrots
  • 1 rutabaga peeled and cubed
  • 1 large Japanese sweet potato peeled and cubed
  • 1 cup chopped green onion (green part only)
  • 1/3 cup garlic infused olive oil
  • 2 Tbs. grated fresh ginger
  • 1 Tbs. dried rosemary
  • 1 1/2 tsp. cinnamon 
  • 1 1/2 tsp. turmeric
  • 1 tsp. cumin
  • 3 pinches of saffron strands
  • 1 tsp. sea salt
  • 1 tsp. pepper
  • 1 Tbs. red wine vinegar
  • 1 1/2 cups homemade bone broth
  • Freshly squeezed juice of one large orange
  • 1 Tbs. maple syrup 
  • 1/2 cup golden raisins 
*Update: We've found that if you take the leftover juices from the chicken pan and combine it with a can of pumpkin puree, it makes an amazing pasta sauce!

Instructions:

  1. Preheat oven to 400 F and take out a 9 by 13 inch glass baking dish.
  2. Peel and cube the rutabaga and let boil in a medium sized pot for 30 minutes while preparing the remaining ingredients.
  3. In a small pot, saute the green onion in the garlic infused olive oil ( *Note: you can make your own by adding 5 to 6 crushed garlic cloves to your oil and sauteing for 3 minutes on medium high).
  4. Add ginger, rosemary, cinnamon, turmeric, cumin, saffron, sea salt, and pepper to the pot and stir occasionally for 3 minutes; set aside for 5 minuted to cool. This will be your "sauce".
  5. Once cooled, add vinegar, bone broth, orange juice, maple syrup and stir until thoroughly incorporated.
  6. Place chicken thighs, rutabaga, Japanese sweet potato, and carrots in a very large bowl.
  7. Pour the sauce over your mixture and toss all ingredients until well coated.
  8. Transfer the ingredients to your glass baking dish and place in the oven.
  9. Bake for 1 hour, stirring and flipping the ingredients every 15 minutes.
  10. In the last 10 minutes of baking, add the golden raisins and stir.
While this dish is a bit labor intensive, it is so worth it. This would be perfect for a Sunday afternoon meal, with leftovers for Monday. Enjoy!
***
A Spunky Inquiry:
What are some recipes that you wish could be made into a paleo or low FODMAP version?


Wednesday, August 17, 2016

The Stand Alone Bacon Cheeseburger


Do you ever miss eating a juicy burger on a bun?

So do I! My burger always seems boring without my beloved bun. However, my stomach does not love buns as much as I do, so they're a thing of the past for me. Since then, I've been on the search for ways to add flavor without using FODMAPs, which has brought us to our two main heroes.

Green onion and bacon! Who doesn't love bacon? This burger is packed with flavor, making the no-bun lifestyle much more bearable. That's why I decided to call these 'stand alone' bacon cheeseburgers. They're so yummy that you don't need the bun. And dare I say, some of you may not even miss it!

The cheese is also a pretty important flavor here, but not everyone eats dairy. Cheese is a sort of gray area in the paleo world. I think it is okay to have in moderation and is okay to eat if your body tolerates it well. Your food choices are all about making the best decisions for healing your body; do what is best for you. If you do not eat dairy, you can use vegan cheeses, or homemade dairy free cheese of your choice.

These beauties will surely be a hit at your next cookout. They'll impress everyone from your picky eaters to your food critics. Serve them with your favorite side dishes and get the party started!


Serves: 4
Prep Time: 20 minutes
Cook Time: 15 minutes
Total Time: 35 Minutes

Ingredients

  • 1 1/2 lbs. grass-fed ground beef
  • 1/2 cup shredded sheep milk cheddar cheese (omit or replace with vegan / homemade dairy free cheese for paleo and GAPS option)
  • 5 slices of uncured bacon, chopped into bits
  • 1/4 cup chopped green onion (green section only)
  • 1 tsp. garlic infused olive oil
  • 1/2 tsp. sea salt
  • 1/2 tsp. black pepper
  • 1 tsp. dried parsley
  • 1/2 tsp. dried basil (plus extra for garnishing)
  • Optional: brie or cheese variety of choice for topping

Instructions:

  1. Preheat grill to high.
  2. Cook slices of bacon until crisp while waiting for grill to heat.
  3. Roughly chop bacon slices and green onion (green part only).
  4. Combine remaining ingredients in a small bowl and thoroughly incorporate with the ground beef.
  5. Divide mixture evenly into four patties and place on grill.
  6. Cook for 15 minutes or as desired.
  7. If you tolerate dairy, top with brie cheese and allow to melt. Otherwise preferred dairy free cheese.
  8. Garnish with basil and serve.

You can top your burger with whatever condiments you like, the flavors used are very versatile.
We love to eat these burgers year-round, but there's just something special about having them on a summer night. Get your grill sizzling and everybody's mouth watering with these babies!
***
A Spunky Inquiry:
What's your favorite cheese replacement?

Tuesday, August 16, 2016

Mediterranean Salmon

Finally some salmon with flavor!

Salmon is often one of the top protein choices for people in the healthy living community, my family included. Lately we've been having salmon for dinner twice a week. Needless to say, like many of you, we've gotten stuck on the repetitive flavor merry-go-round. Our tried and true favorites needed a little TLC!

 This recipe was fueled by the need for some flavor punch in the taste buds after having given up FODMAPs. That means onion and garlic are no longer able to steal the show. Enter some delicious feta cheese. I know, I know, at the mere mention of dairy many of you are already raging in protest. 'Dairy products aren't paleo,' you say, 'some of us can't eat dairy'. Hear me out for a second.

Doing special diets to heal your gut are all about individual needs. I personally tolerate certain cheeses well as do many others, and if you do not or you choose not to consume dairy, that's okay too! And for that portion of my audience, you will be pleased to know, you can just as easily use a dairy-free alternative!

For our dairy-free friends, you can choose any sharp vegan cheese or homemade dairy free cheese in place of the feta. The taste won't be exactly the same, however it will be delicious in its own rite. Yay, for options!

On to the recipe...


Serves: 4
Prep Time: 10 minutes
Cook Time: 15 minutes
Total Time: 25 minutes

Ingredients
  • 4 salmon fillets
  • 3 Tbs. grass-fed butter or ghee
  • Zest of 1 large lemon
  • 2 tsp. dried dill
  • 1 Tbs. dried parsely
  • 1 tsp. sea salt
  • 1/2 tsp. pepper
  • 1/2 cup feta cheese (Dairy-free option: 1/2 cup sharp vegan cheese or homemade dairy free cheese)

Instructions:
  1. Preheat oven to 450 F and line a baking sheet with parchment paper.
  2. In a medium bowl combine melted butter or ghee with all remaining ingredients except the cheese.
  3. Place salmon fillets on the baking sheet and spoon mixture evenly over the top of each fillet.
  4. Place in the oven and bake for 15 minutes.
  5. Remove from oven and plate the fish, garnishing each with the cheese.

I hope you like this recipe as much as we did! Ours was paired with a side of green beans and a sweet potato, but this would go beautifully with just about anything. Enjoy!
***
A Spunky Inquiry:
Which recipes need new life in your kitchen?